Weaving on a warp weighted loom
Published on May 01, 2025 by Impaktor.
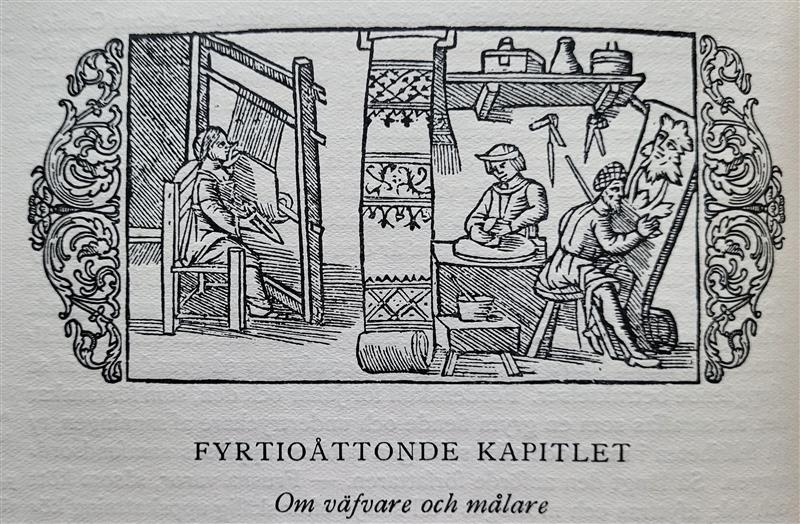
Nordens kvinnor hafva beundransvärda anlag för att väfva linne och ylleväf och
ägna sig med ifver däråt, unandtagandes lappkvinnorna. Dessa göra väfnader af
djursenor, så som på ett annat ställe är sagdt, och ändamålsenliga plagg af
olika djurs hudar. I denna aflägsna landsända växer ju intet lin och lefva inga
får. Men i varmare trakter af Norden, där lin finnes, spinnas däraf trådar,
som färgas och väfvas så skickligt, att man skulle tro arbetet vara gjordt
midt i själfva Latium. Jag såg en gång hoss dessa folk en den vackraste
linneväf med himmelsblå ränder. Då jag sedermera kom till Italien och nådde
Rom, fann jag en väfnad liksom gjord af samma hand, med samma randning och i
allo lik den förra, dock med något litet förbehåll.
Olaus Magnus (circa 1555 AD), book 16, chapter 48, (p. 88),
Table of Contents
1. Introduction
The warp weighted loom can be traced back 5000 years in history through archaeological finds in Central Europe, and 4000 years in Scandinavia. Mainly we find the weights, used to weigh down the warp threads, as a line of rocks or burnt clay weights along a wall in the house. In Troy they’ve fond a row of golden beads that were part of a weave.
If the clay weights were not burnt, they would simply dissolve over time, unless the house burnt down, thus acting like a clay oven.
Interestingly, the loom pre-dates the use of wool, as the woolly sheep did not enter the Middle East until 3500 BC. Instead they used plant fibers to weave. The oldest depiction of a warp weighted loom stems from the petroglyphs in Valcamonica in Italy and dated to 1400 BC.
The warp weighted loom was well suited the European way of life, in that it allowed weaving indoors (good for cold climate), yet took minimal space (good in crowded homes).
The tredle floor loom started gaining traction in Europe in the 13th century, and grew steadily in adoption, as its efficiency was unmatched: 1 hour of weaving corresponds to one day (8 h) of weaving on the warp weighted loom.
Yet, there were still a few places that held on to the warp weighted loom, such as Iceland and Norway. In the 18th century the government in Denmark sent tredle floor looms to Iceland to demonstrate its efficiency by having it compete against warp weighted looms. The proponents of the warp weighted loom argued it was easier to set up and get started, which is true.
By the second world war the warp weighted loom had been abandoned by the few who had still kept the practice alive through the 19th century. The generational knowledge of its operation would have been lost if not for Marta Hoffmann who in the 1950s traveled through villages in Norway asking if anyone knew of any weavers. She found three families with older women who still had the knowledge, and persuaded them to set up the loom and demonstrate how to work it.
Her extensive documentation lead to the publication of her book “The Warp-Weighted Loom: Studies in History and Technology of an Ancient Implement” (currently priced at $2000 on abebooks.com).
Part of the documentation Hoffmann did included filming:
- Åkleveving på oppstadgogn (stumfilm) youtube; “Fra Liarbø, Fitjar.
Oppstadvev er en oppestående vevstolsom ble benyttet til billed- og
åkleveving. Fotograf er Per Gjærder. Produsert av Marta Hoffmann i 1956.
NF.Film-10517" - Glimt fra greneveving - Manndalen, Troms 1955 (stumfilm) youtube;
“Greneveving fra Manndalen i Troms. Anna Hansen Blomsterli vever grene.
Filmen er produsert av Marta Hoffmann.
NF.Film-10487"
For those looking to get into warp weighted looms from first principles, I recommend issue 13, 1986 of “Forntida teknik” (pdf), which starts with instructions on how to build a warp weighted loom, and then builds from there. Another good reference, on weaving is the danish book Kirkes væv: opstadvævens historie og nutidige brug by Karen-Hanne Stærmose Nielsen.
2. Warp weighted loom
2.1. The weave
The weave consists of the warp threads (up-down) (swe: varp) and the weft (left-right) (swe: inslag). We use 3 threaded wool yarn, which is strong and not at risk of snapping during the weaving.
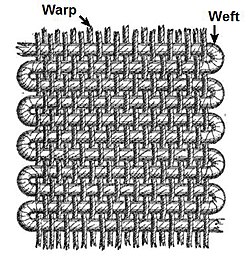
Figure 1: src wiki
The technique we use is “plain weave” (swe: tuskaft) a.k.a. tabby weave, where we have two horizontal bars, forming a shed (swe: skäl) through which we thread the weft, which results in a very strong “plain weave”, that is both simple to weave and strong. There is also twill (swe: kypert), which is how denim is woven, which results in the diagonal pattern seen in its fabric, but to do this one needs a third bar, with a third layer of warp strings and is not something I will dabble with this here.
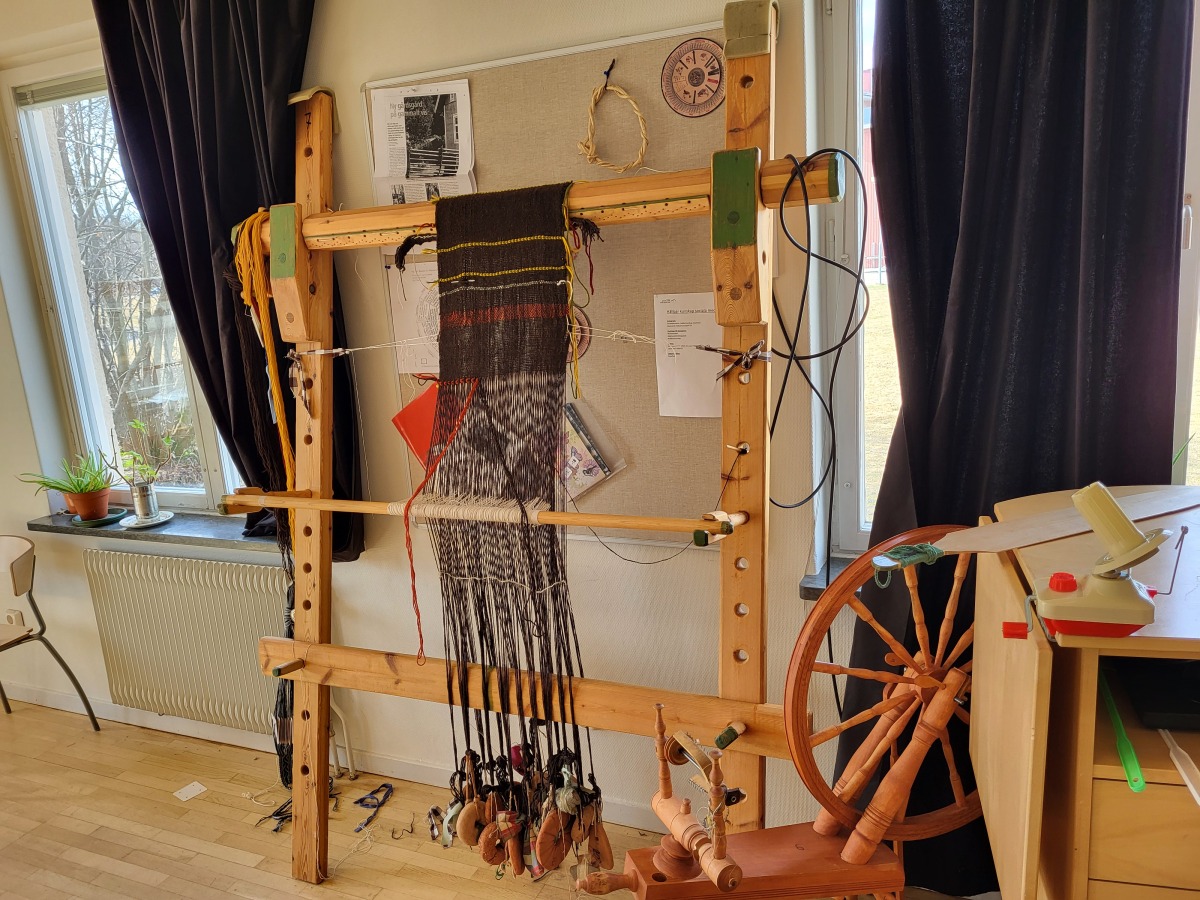
Figure 2: My warp weighted loom for the week
2.2. Setup: Initial “bootstrap” weave
Technically, we weave twice, first once to get a weave onto the loom, then it is rotated 90 degrees (such that weft becomes warp threads and vice versa). Setting this initial weave up took 3 days for a 40 cm wide weave, partially attributed due to making many “beginner mistakes” / bugs. A seasoned weaver might have done it in 1 - 2 days, I would expect.
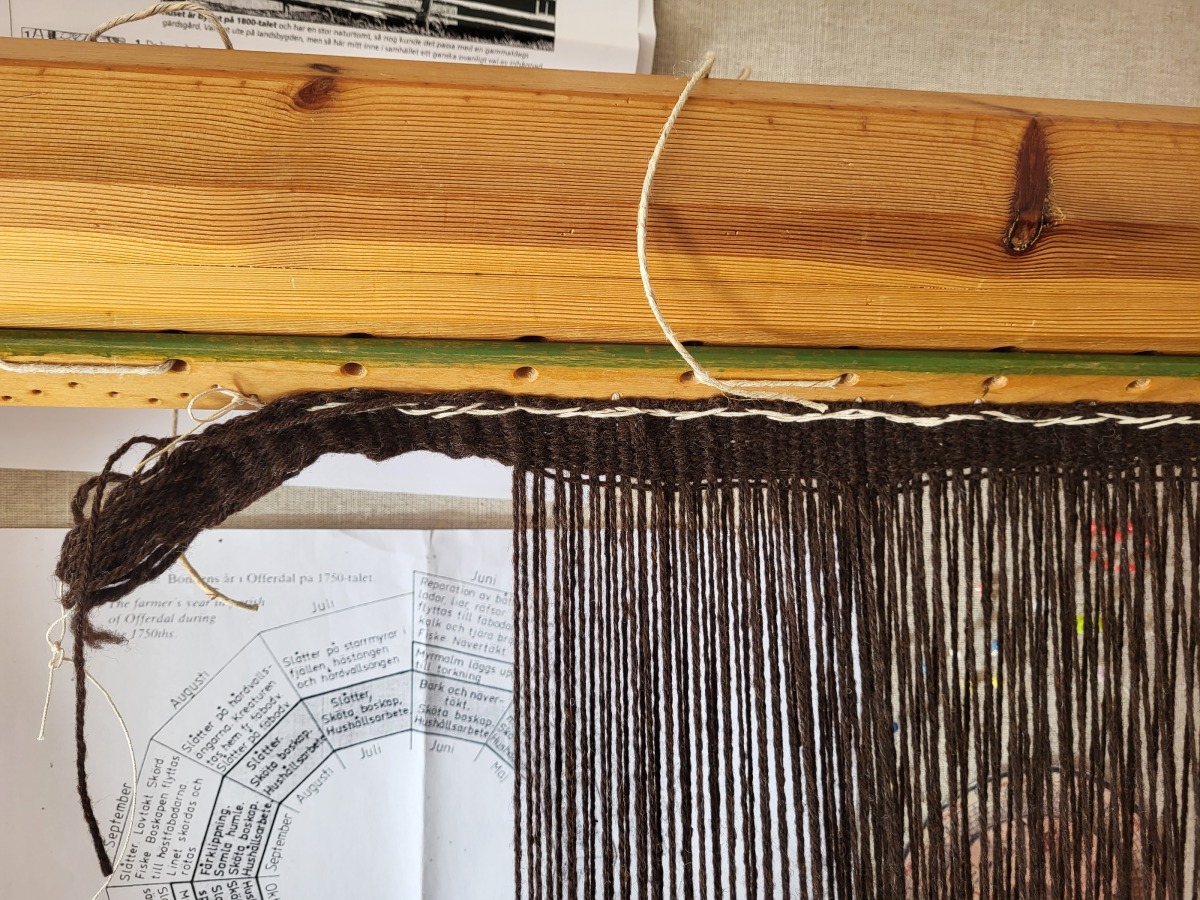
Figure 3: Once the “bootstrap” weave is done, we stich it to the horizontal beam.

Figure 4: We tie the weights, such that we get 40 g / thread, e.g. 10 threads to one 400 g weight, except the outer weights which have 5 threads to 200 g weight. We use white cotton thread (upper part of picture) and crochet (swe: virkning) it catching each warp thread in a loop, such that the weights do not change the distance between the warp threads.
2.3. Setup: Tying leashes
Next we need to tie the leashes (swe: solv) which will thus form our shed (swe: skäl) – the space between the two layers of warp-threads. This means we tie every other thread to the heddle bar, and then 5 loops around the bar itself to get correct distance between each thread. In this process it was very easy to introduce bugs (miss a string, or tie the wrong string).
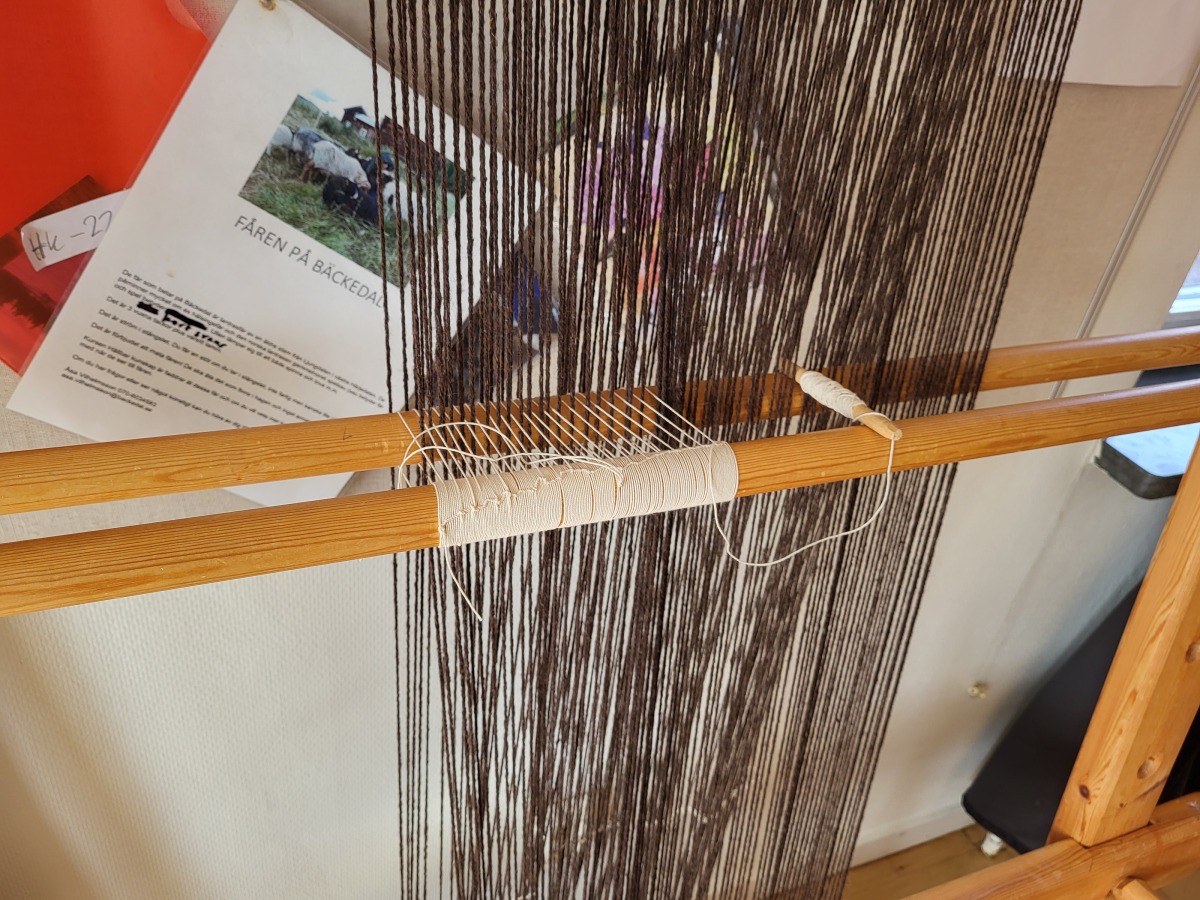
Figure 5: Leashes (swe: solv). We tie 5 loops around the heddle bar, for each warp thread (behind) that we tie to the heddle bar.
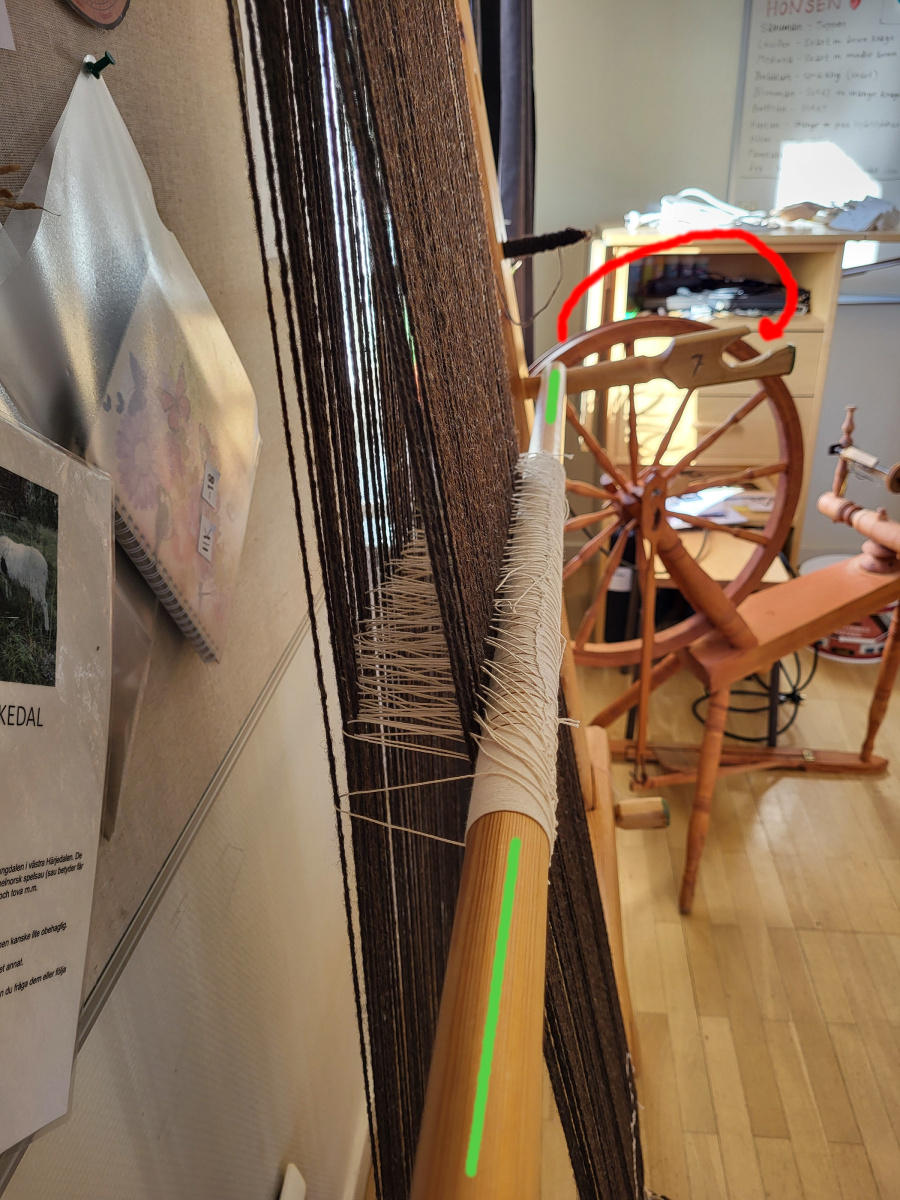
Figure 6: Leashes & shed. When weaving we will push a thread (weft) between the two layers, then pull the heddle bar (green) out (red), which will pull the warp threads on the left through the other warp threads.
2.4. One iteration
Weaving is essentially a loop where we iterate the process of passing the weft (swe: inslag) thread through the shed (swe: skäl) - the space between the two layers of odd and even strings, (if we imagine the warp threads numbered).
A single iteration consists of:
- Pull the weft through the shed
- Tighten the thread and pull it diagonally upwards (figure 8)
- Distribute the weft thread evenly (see “smiley faces” below, in figure 9)
- Push the weft up with a beater sword
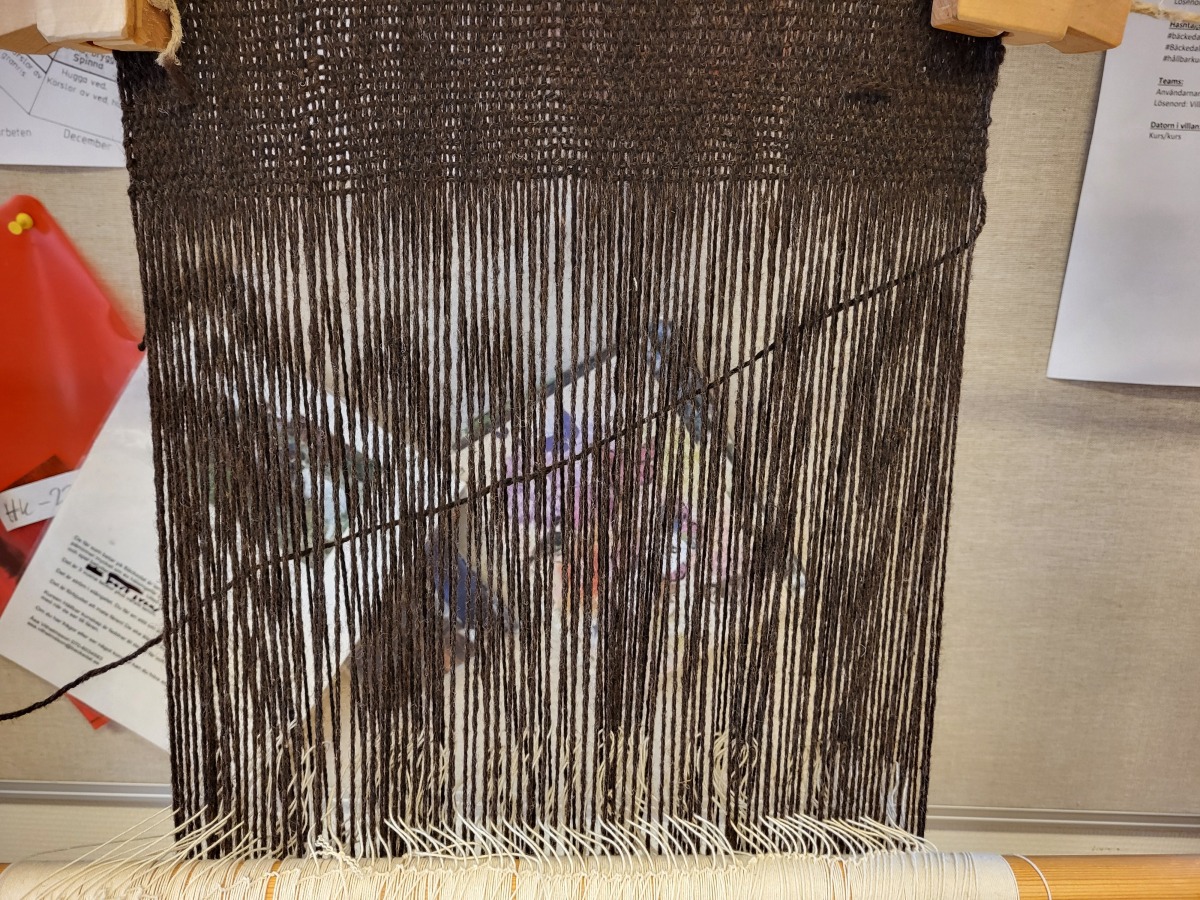
Figure 7: Guide the thread between the shed (swe: skäl), and tighten it slightly

Figure 8: while tightening it, raise your arm holding the thread, to make a smiley
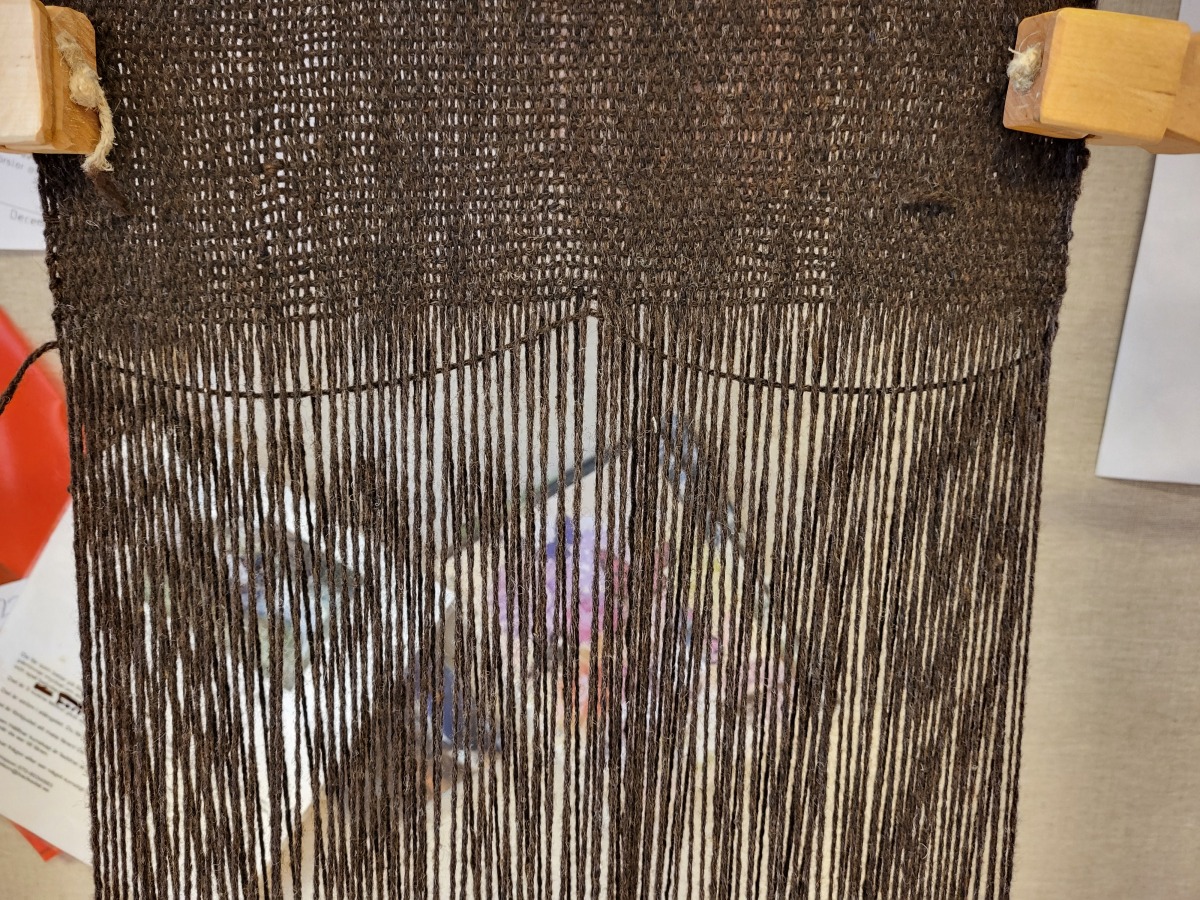
Figure 9: with your finger, make two smiley faces…
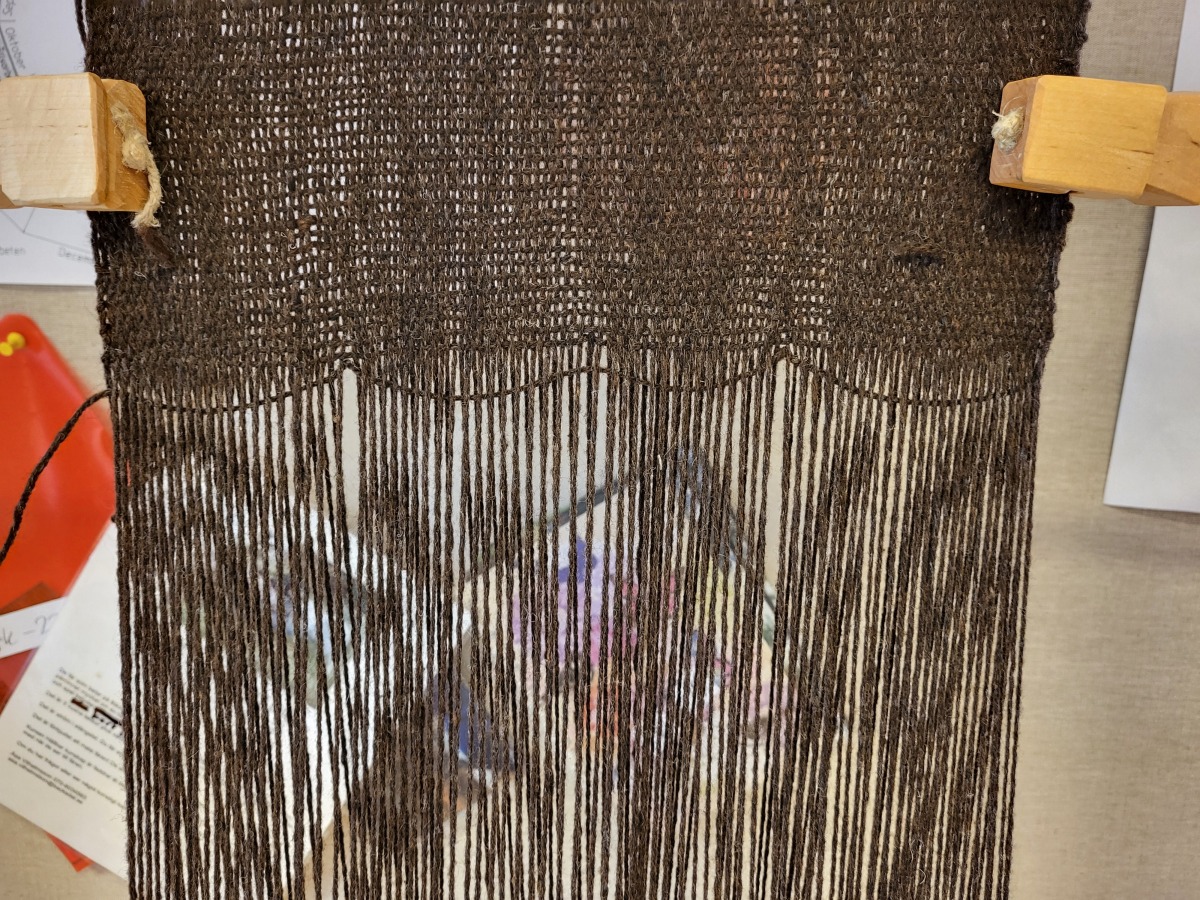
Figure 10: …and four
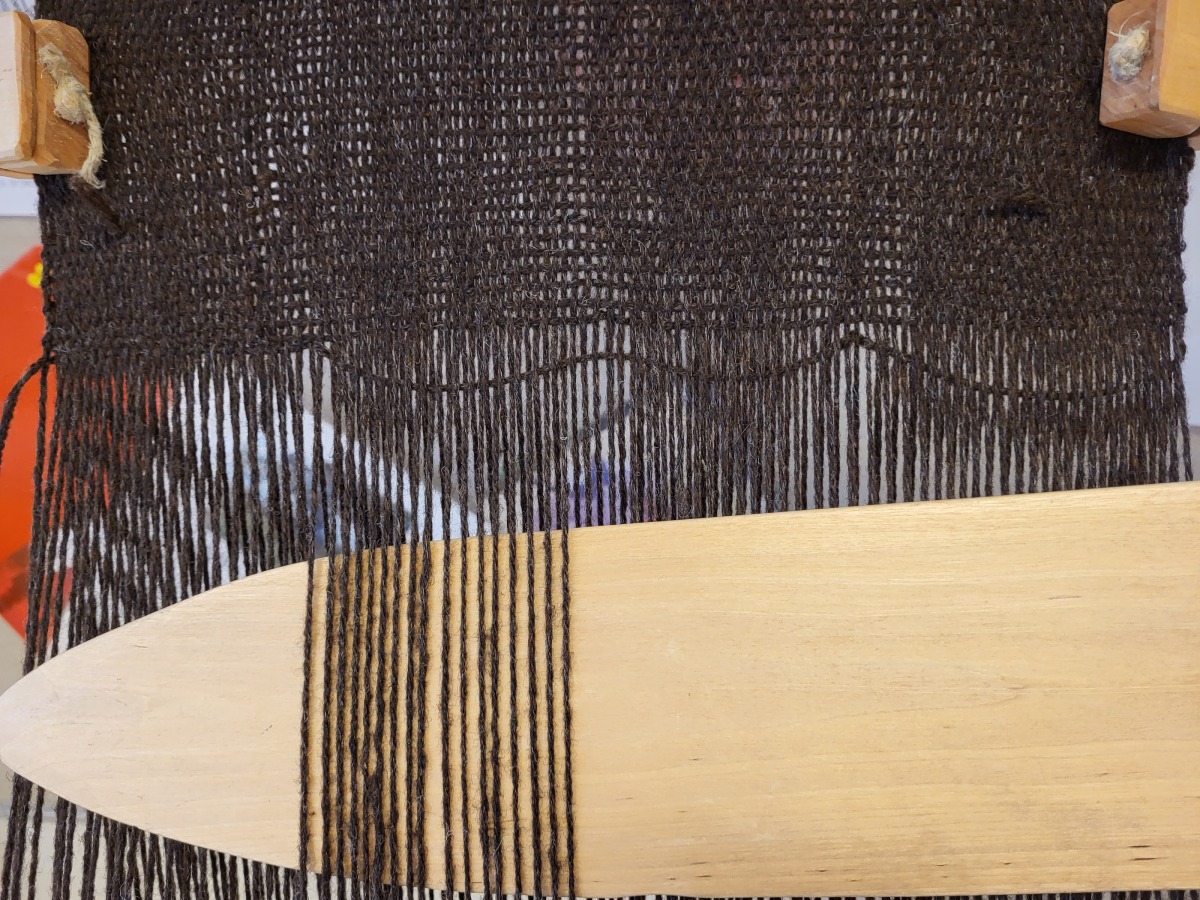
Figure 11: next, use the wooden sword to bash the thread up
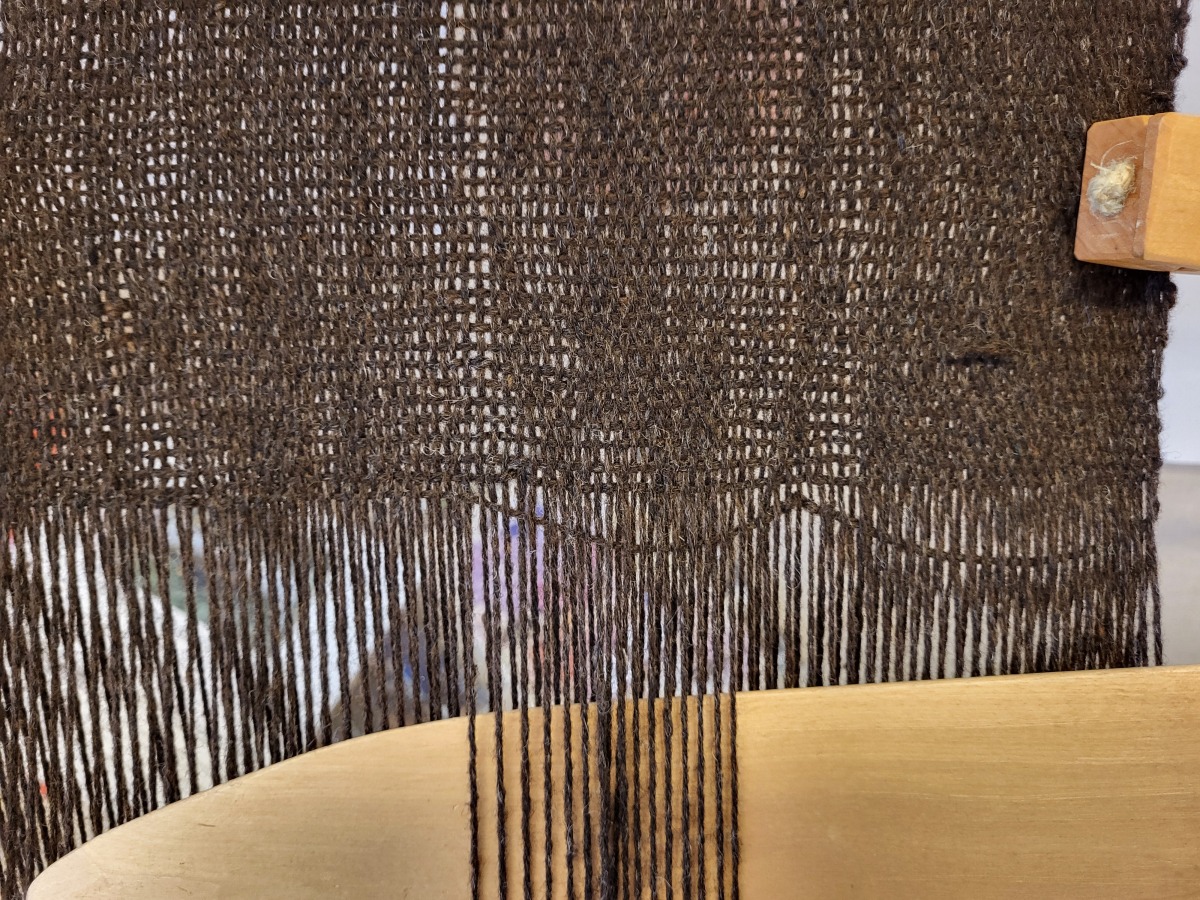
Figure 12: Do it in small segments, until the entire thread is in place with the rest of the weave
2.5. Prevent warping
As you weave, the weft threads tend to push the warp threads together, tightening the width of the weave into a funnel shape. I used two methods to conuter this
2.5.1. Toothpick
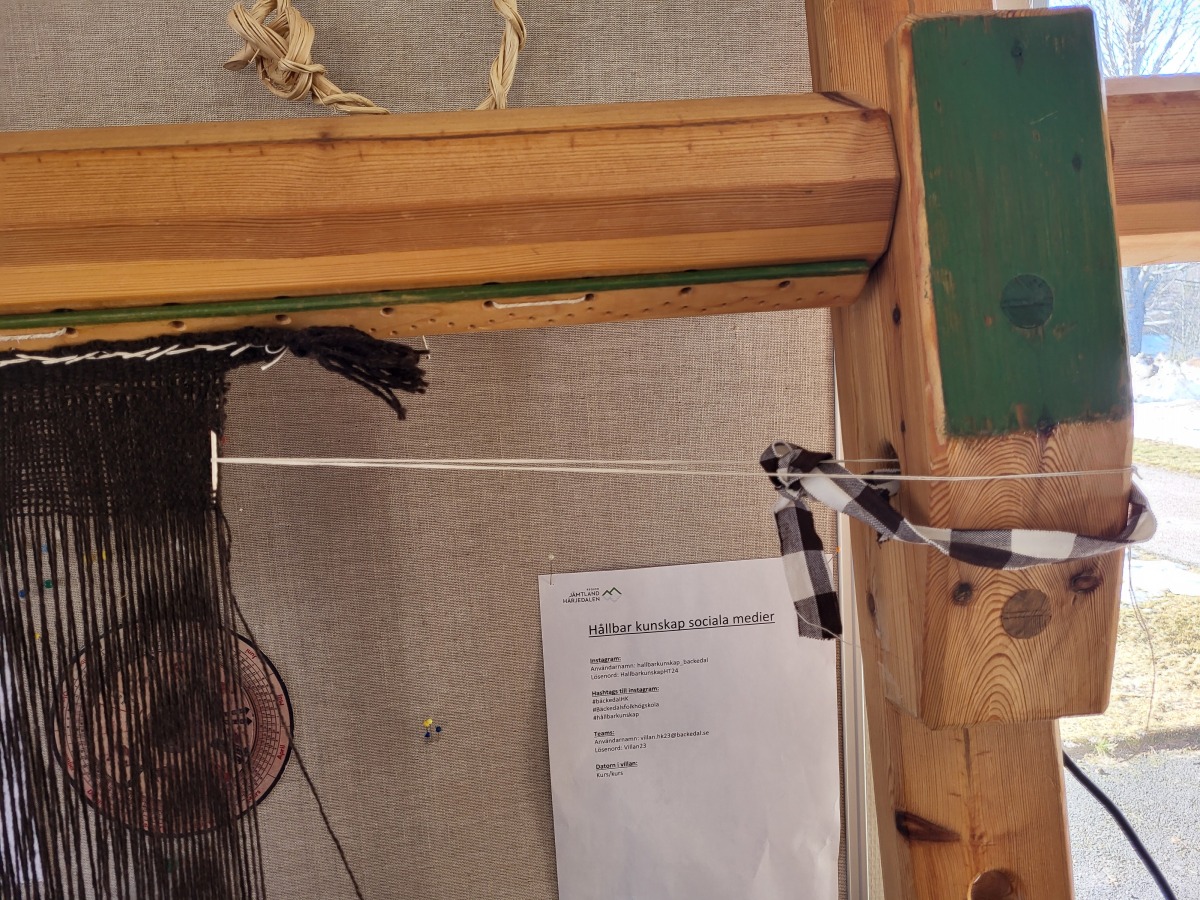
Figure 13: Toothpick and a piece of string, on each side to pull the weave out to correct width again
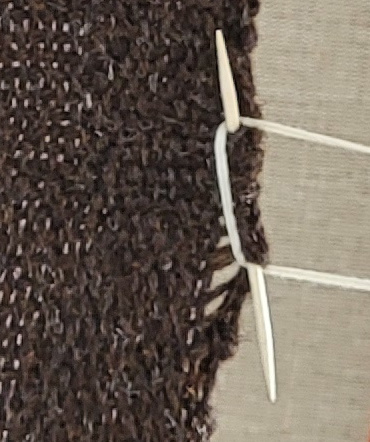
Figure 14: However, toothpick can pull the outer warp-threads out too much, as seen in this picture
2.5.2. Moroccan thread tightener

Figure 15: A better solution is the “Moroccan tightener”
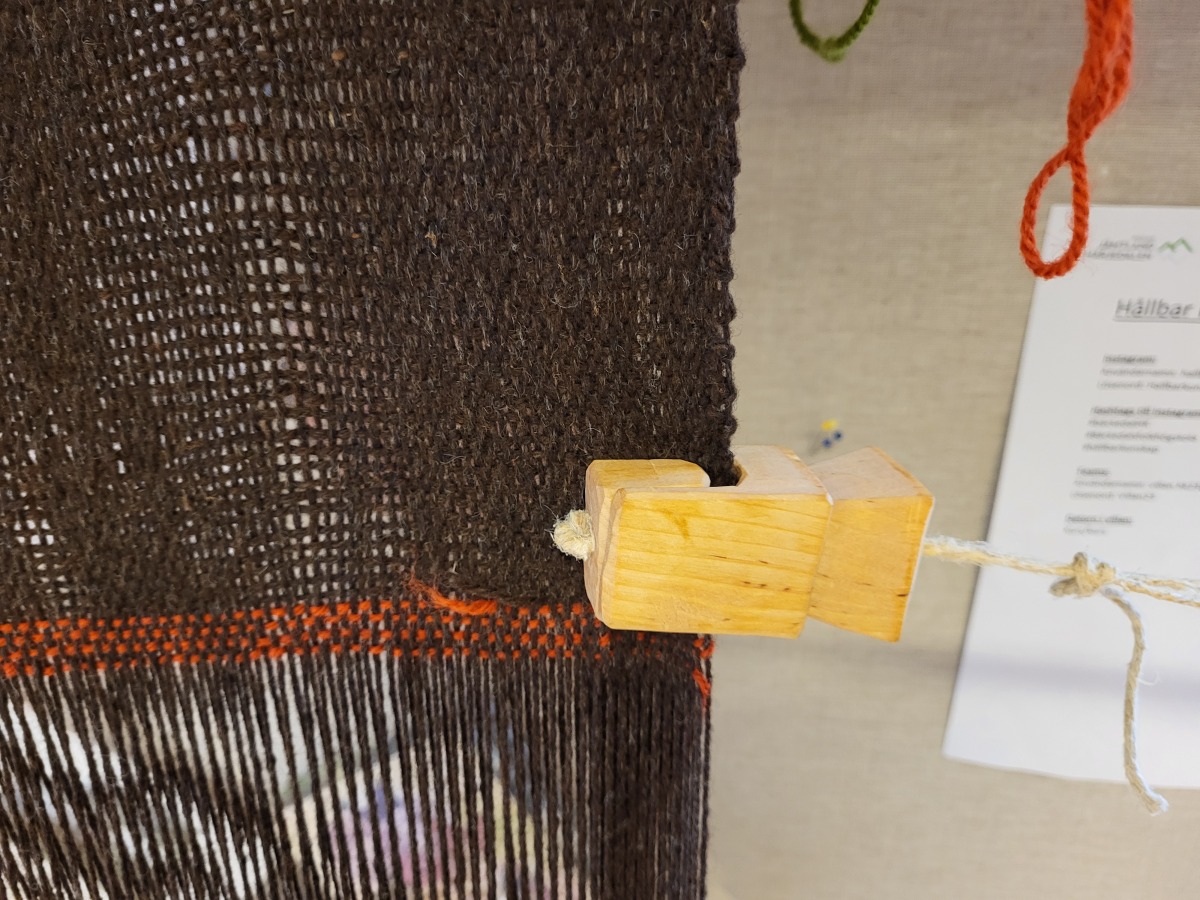
Figure 16: Which holds a larger surface of the weave as it counters the tightening
2.6. Roman braid
To spice things up, I add a “Roman braid” (swe: romersk fläta). Depending on the distance between the warp threads, I include 2-3 in each loop.

Figure 17: Thread that comes up from behind (orange) then goes between the other color (brown).
2.7. Adjust errors
It is difficult to be consistent with how hard you push the weft up with the sword. This can be adjusted by not going the full width with the weft for a few iterations, thus forming a wedge shape (ideally this should be done before adding a stripe of different color threads that would accentuate unevenness in the weave).
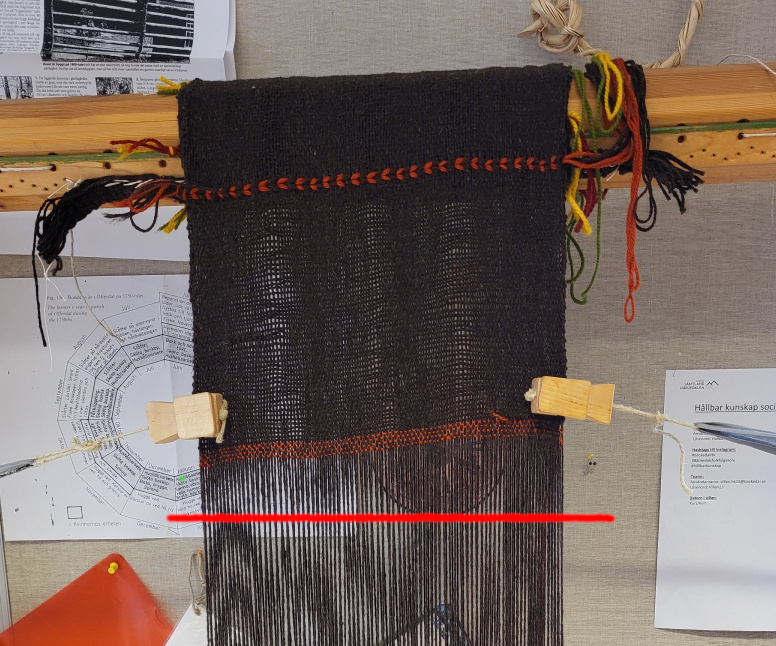
Figure 18: Ideally, the skew/slope of the weave should have been adjusted before adding another colored weft (orange)
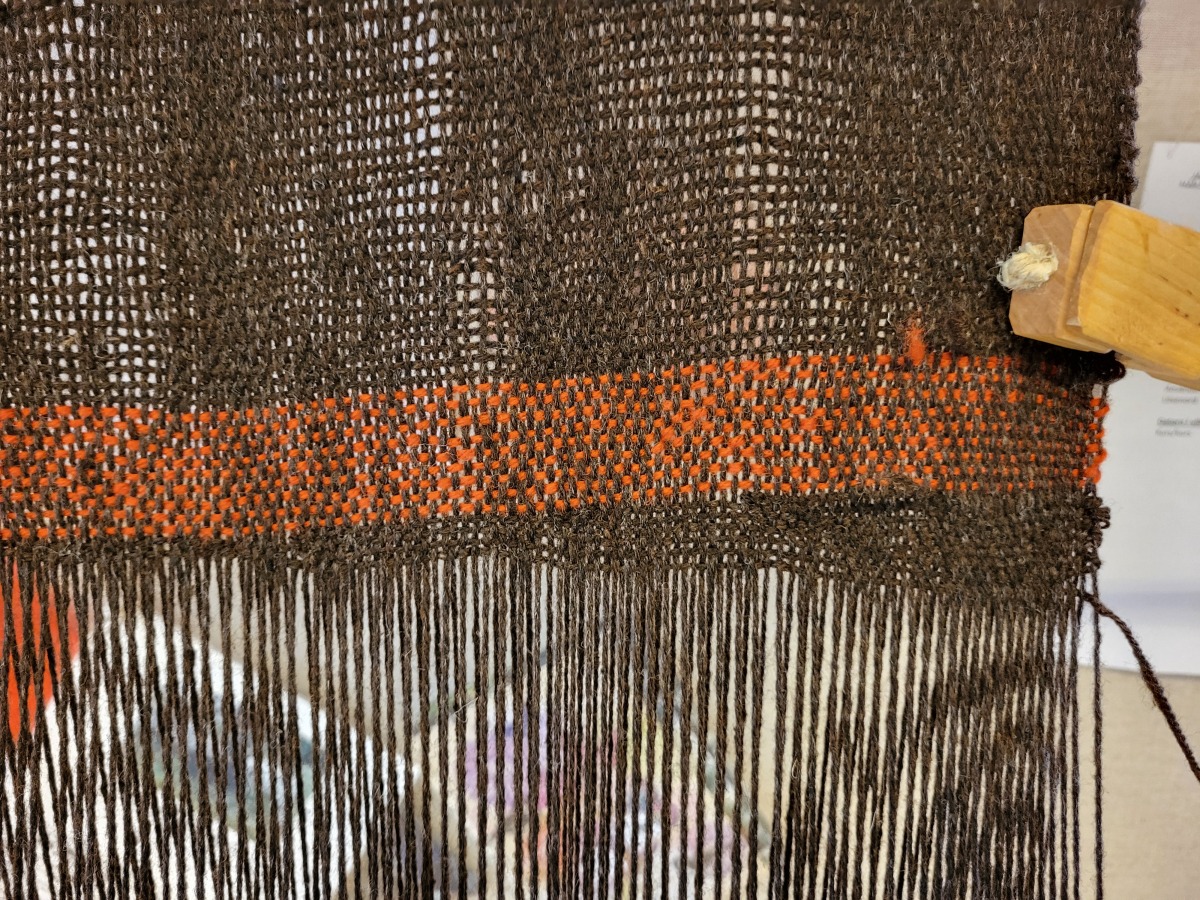
Figure 19: Wedge is made simply by not going thrugh all the warp-threads
Other common “bugs”:
- Check the weights (not machine learning, but actual real weights), such that all threads are weighted down. It can happen that one weight is resting on top of another, or a weight resting on the floor.
- Adjust the horizontal position of the warp threads, such that they are equidistant, use force (allowed, when using 3 threaded yarn).
- Take a step back and assess how the weft is sloping, and adjust accordingly, either use less/more force with the beater sword, or make a wedge (figure 19).
Note: on a warp weighted loom, having many weft threads is generally more cumbersome than on a tredle floor loom, due to the beater (swe: slagbom), thus a weave that is specified to have \(X:Y\) warp/weft threads can be re-balanced to have \((X+a):(Y-a)\) (e.g. \(X=Y=20\), \(a=5\)) if the weave is to be made on a warp weighted loom.
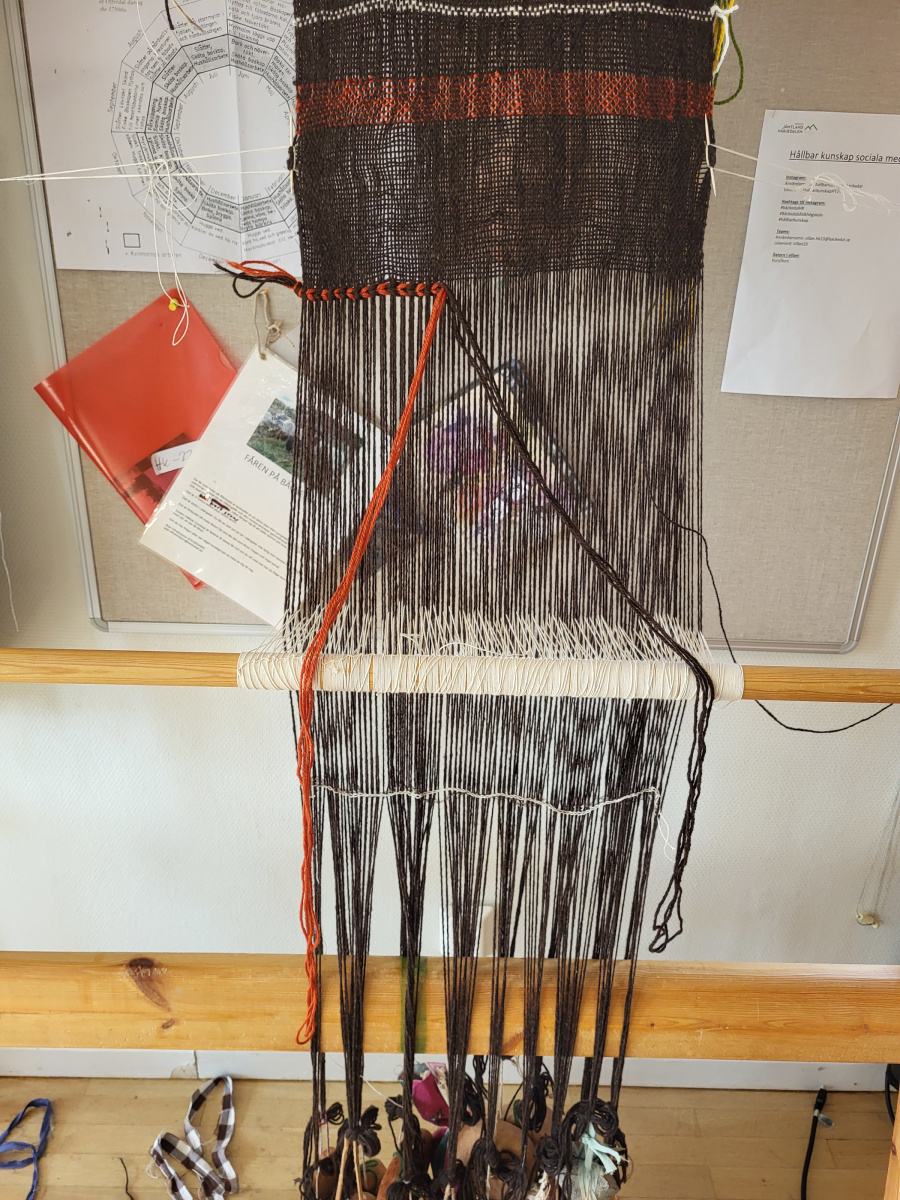
2.8. Final weave
After the initial setup, I weaved for two days, the result can be seen in figure 20 below.
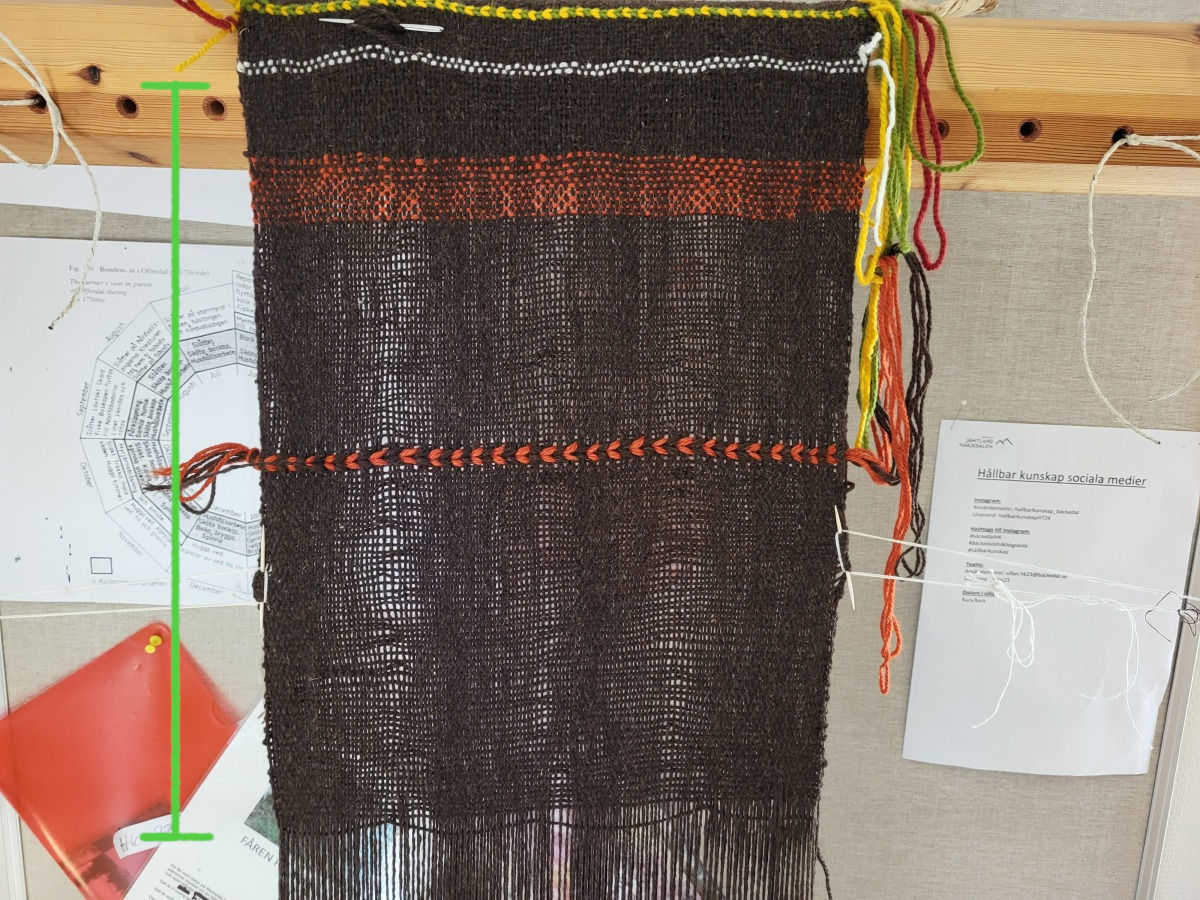
Figure 20: The end result of two 2 days weaving from the white line down
3. Tablet weaving
The upside with tablet weaving (swe: brickbandsvävnad) is it does not require a loom, and only requires a set of cardbords (you can use an old deck of cards).
3.1. Introduction
Traditionally, tablet woven rein (swe: tömmar) were preferred during harsh winters, since leather becomes cold and stiff.
The number of cards (swe: brickor) determines the width of the weave. Beginners are recommended to have uniform color on each card. For the tablet weaving I use cards with four holes / warp threads.
Tablet weaving saw a resurgence in popularity in the 1970s. The cards from this era (and onward) often numbers the holes and cards, however, there is no archaeological basis for this, nor functional once a skill level has been reached, as the weave itself will inform which thread and card is which.
For my simple case, I use 14 cards (14 \(\times\) 4 warp threads), and rotate all cards uniformly after the weft thread has gone through the shed. Nor does rotation direction matter, (either all cards forwards, or all cards backwards), however, when changing direction there will be a visible symmetry breaking in the pattern.
Recommended reference books:
- Beginner favorite
- Applesies and Fox Noses - Finnish Tabletwoven Bands by Maikki Karisto and Mervi Pasanen, (2013)
- Swedish favorite
- Brickvävning - så in i Norden, Sonja Berlin Englund, (1994)
- Advanced favourite / the “bible”
- The Techniques of Tablet Weaving, Peter Collingwood (1982)
3.2. Execution
For the initial setup we can completely ignore orientation of the cards, or order, as we will sort that out once the make the first rotation (“iteration”) of the cards.
I make a small yarn that will be my weft, that I pass through the shed. I tighten it only after next rotation (figure 22). Once the yard of weft thread is used up, I make a new yarn, and overlap it with the old for 3 rotations.
I do not use a beater sword, but instead use the side of my hand to push the weft towards the rest of the woven threads.
Unlike the plain weave I made with the warp weighted loom, the weft thread will be invisible, except for in the side, since the weave is 4 threads thick, hiding the weft. Thus I choose my weft yarn to be of the same color as the outer most warp threads (orange).
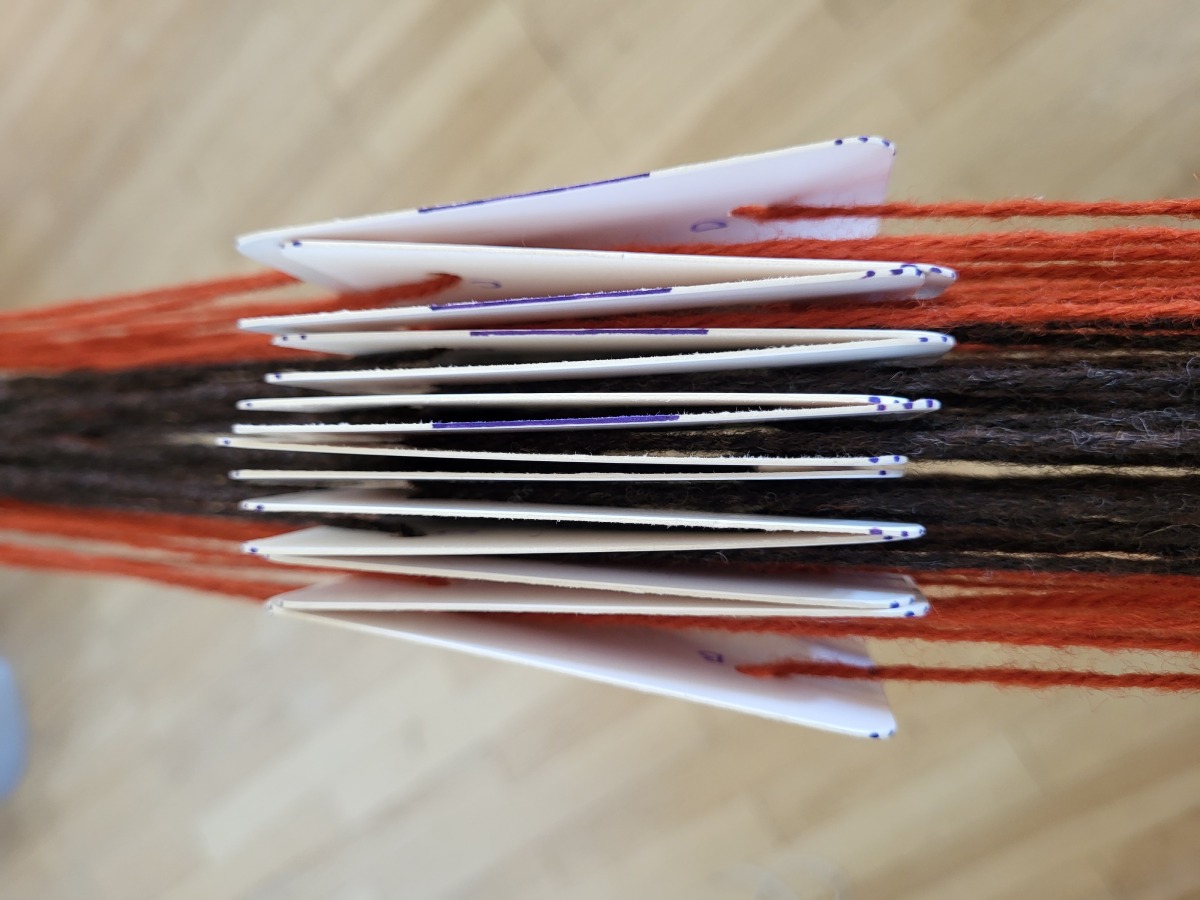
Figure 21: You need equal number of cards turned left/right. Either one half to one side, and the other half to the other; or as I have done here, every other is turned to each direction. I have 6x4 orange and 8x4 brown warp threads.
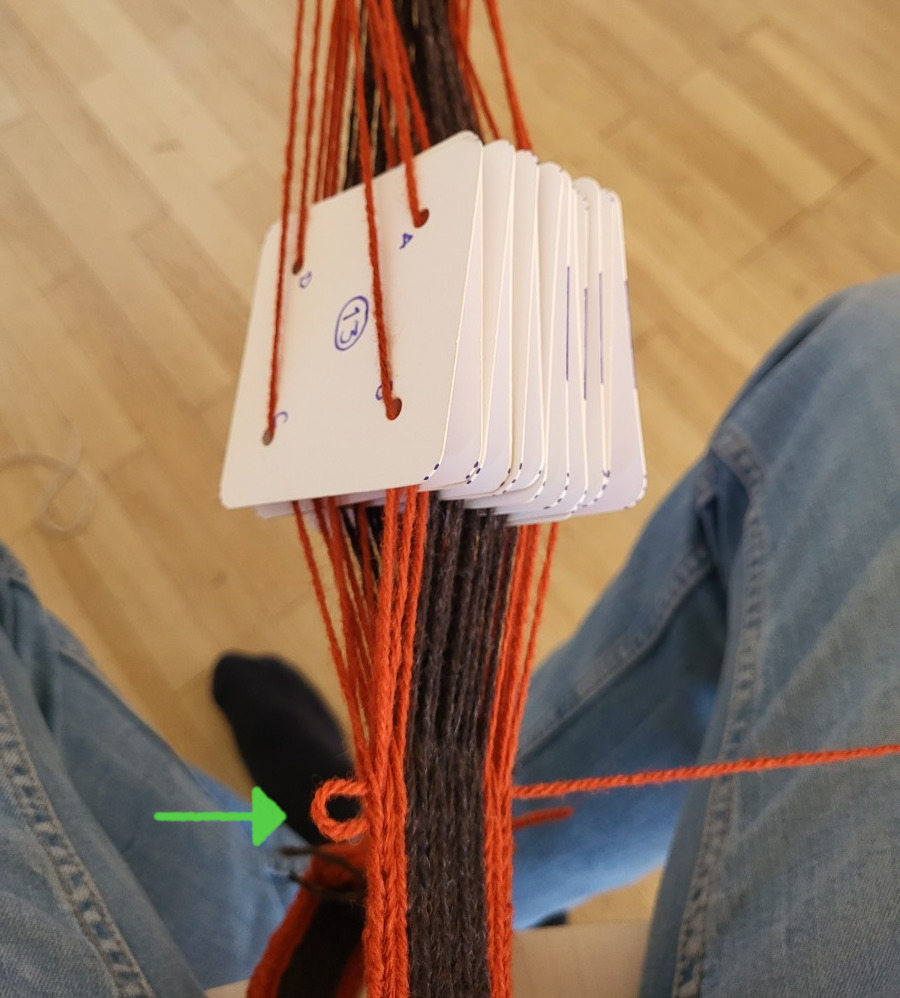
Figure 22: Each card has 4 threads. For my simple pattern, they are uniform in color for each card. The weft thread (green arrow) is tightened after I have rotated all the cards and “bashed” / tightneded the “skäl”
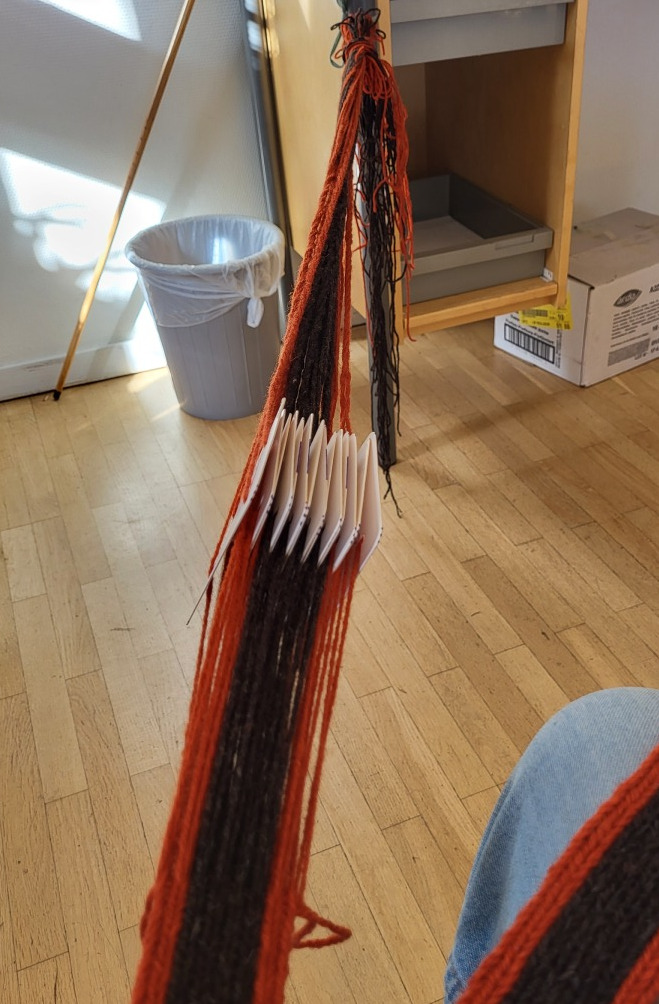
Figure 23: We do not use warp weights, but instead comb through the warp threads, then tie them to something that anchords them, here it is to a table
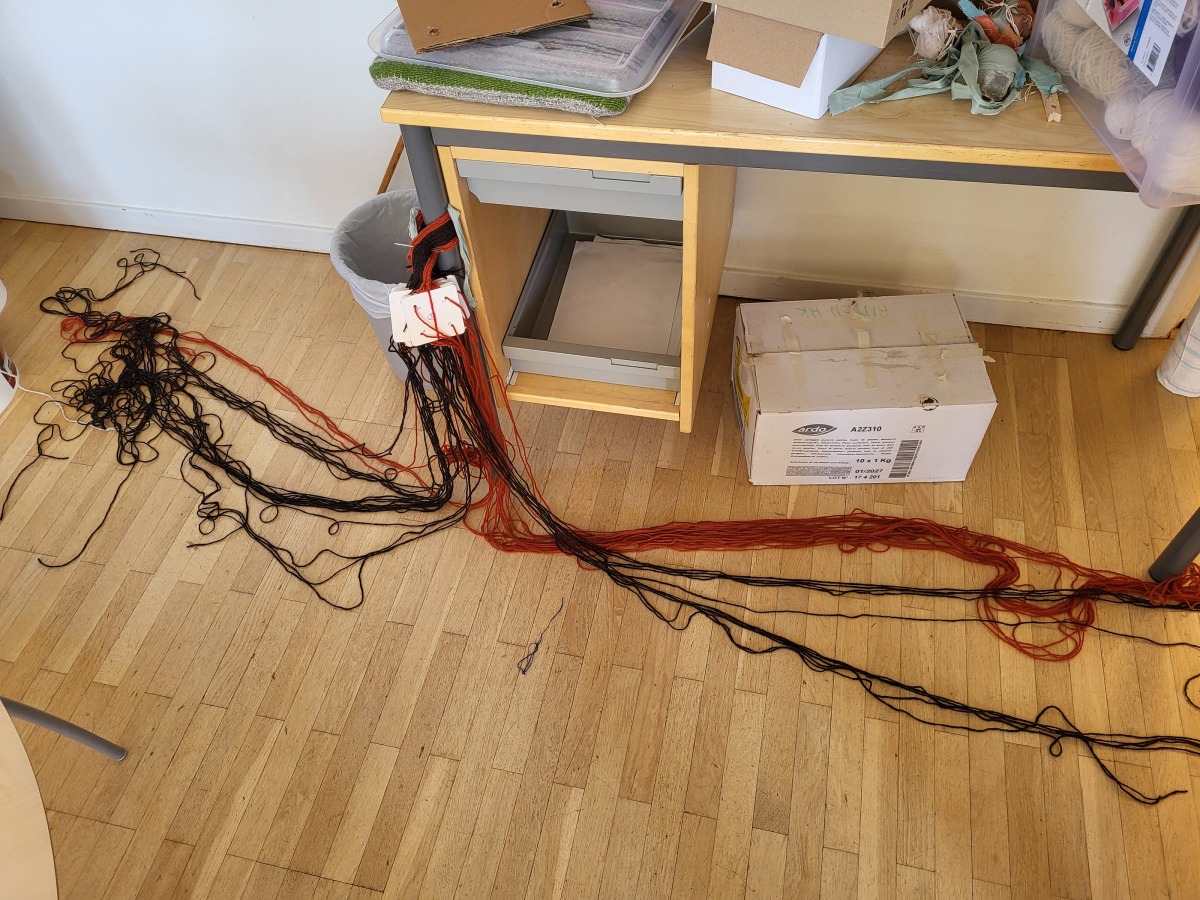
Figure 24: When not anchored around my waist, I anchor it to a table, to untangle the warp threads. This is needed if I do not change rotation direction since the warp threads will get more and more tangled by each turn of the cards in the same direction.
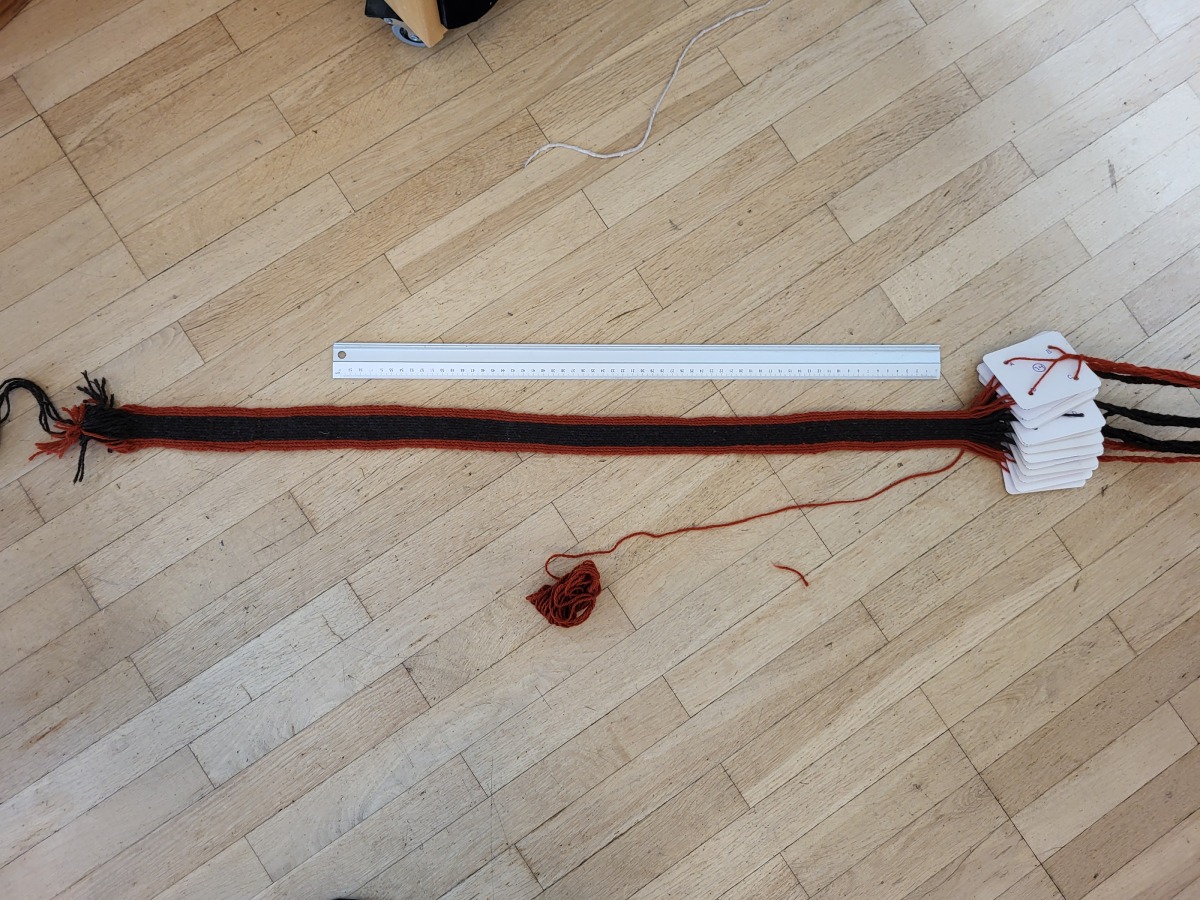
Figure 25: Result: Roughly (my first) one meter in a few hours. Warning: the cards should be tied together (not shown here) using a piece of string when not working with them, such that rotation order is not lost.
4. Pulling it together: making a bag
Next I take my weave and my tablet weave, and sew it into a bag for toiletry-stuff useful when traveling. The tablet weave becomes the sides, and stabilizes the bottom.
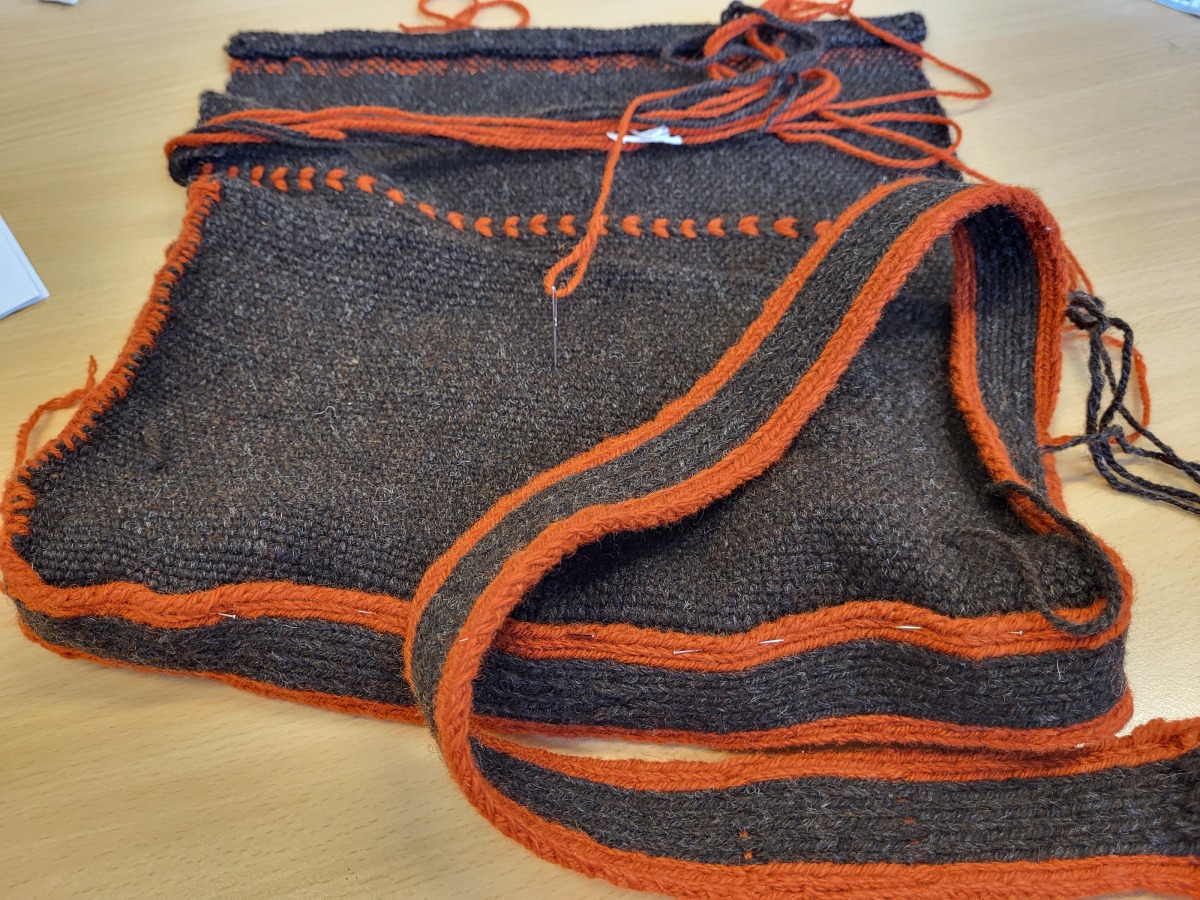
Figure 26: Bag in making
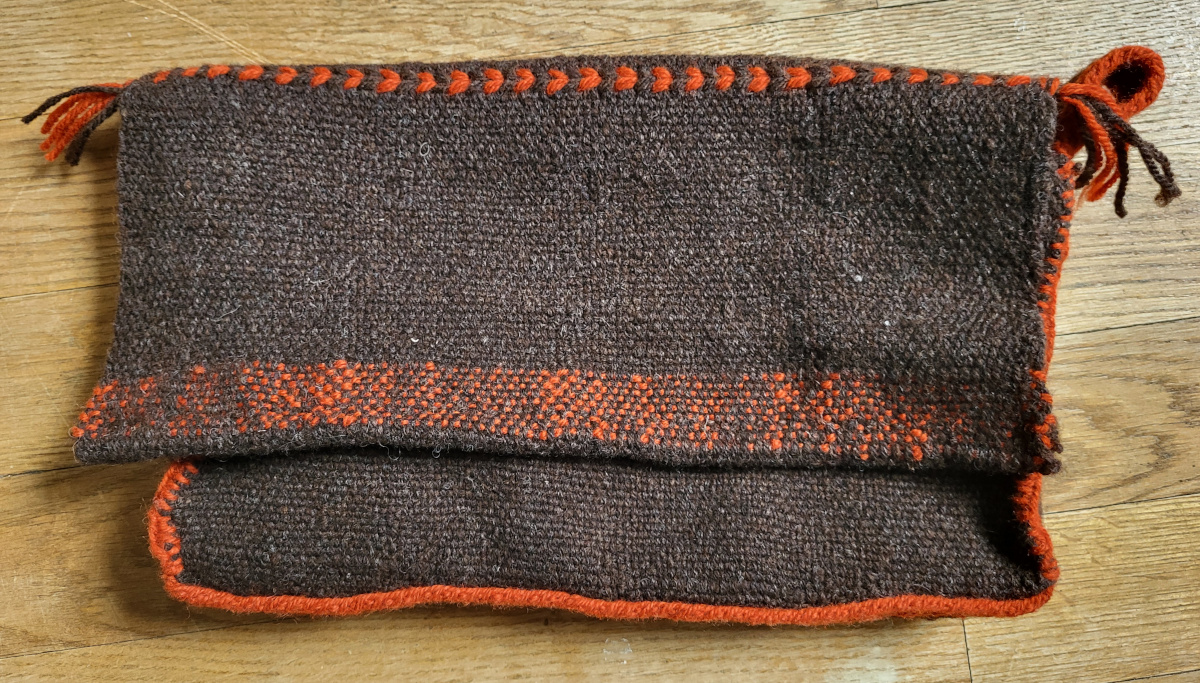
Figure 27: FIN